guHRoo HRIS: How to set up time tracking (for admins)
How to Set Up Time Tracking in guHRoo (for admins)
Introduction
This guide will walk you through setting up time tracking in guHRoo, a process that's essential for accurate payroll and time management.
*You must be signed in as a client-admin user to access the necessary company settings for this setup.
Steps/Procedures
Set Up a Pay Frequency
Since time tracking in guHRoo is linked to your company’s payroll structure, you'll first need to set up a "pay frequency." Employees will track their time based on your company’s pay cycle (e.g., biweekly or semi-monthly).
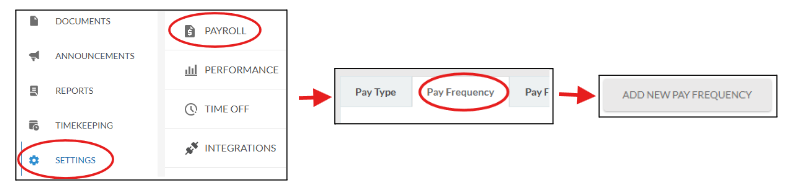
Navigate to Settings and select Payroll from the left-hand menu.
Under Payroll Settings, you will see four tabs: Pay Types, Pay Frequency, Pay Frequency Settings, and Job Codes.
Click on the Pay Frequency tab to manage your pay frequencies.
Select Add New Pay Frequency to begin.
Complete the Pay Frequency Form
Use the information below to fill out the Pay Frequency form accurately:
For Semi-Monthly Pay Frequencies: Additional fields will appear—First half start date and Second half start date. Enter the beginning dates of two consecutive pay periods. You can choose dates from the current month or a previous month, but ensure they are no more than 25 days apart.
Example: If your pay periods run from the 1st-15th and 16th-end of the month, you would enter 1/1/24 and 1/16/24.
Once all information is entered, click Save to save your pay frequency.

Note: Only one pay frequency of each type can be active at any time. For example, you may have one biweekly frequency and one semi-monthly frequency but not two semi-monthly frequencies.
Choose Your Time Tracking Format
The default time tracking format is Hours:Minutes
. If you prefer a decimal format, you can change this under the Pay Frequency Settings tab.
Review and Confirm
At this point Stop! Double-check all the information you entered in the pay frequency settings. Once a pay frequency is assigned and employees start using it, you won’t be able to edit its details. If changes are needed, you’ll have to disable the current pay frequency, create a new one, and reassign your employees to the updated setting. Time records under the old pay frequency will still be accessible.
Assign Users to a Pay Frequency
The final step is to assign your employees to a pay frequency. There are two ways to do this:On the Employee Profile:
Go to the employee’s profile, select the Job tab, and assign the Pay Frequency.
During the Invitation Process:
In the Offer Details step, select the Pay Frequency.
Note: If the employee is still onboarding or hasn’t activated their account, you won’t be able to assign their pay frequency until their account is active.
Troubleshooting
Can’t Edit Pay Frequency Details: If you realize that the pay frequency settings are incorrect after assigning them, you will need to disable the incorrect pay frequency and create a new one. Reassign employees as needed.
Employee Profile Access Issues: If an employee is still in the onboarding process or hasn’t activated their account, their pay frequency cannot be assigned. Wait until the employee has fully onboarded and activated their account.
That concludes the guide for how to set up time tracking! If you are interested in learning about how to set up Job Codes and Job Locations to track employee time for specific activities/locations, see this article.
Related Articles
guHRoo HRIS: How to Approve Time Cards
In this guide, we will walk you through the process of approving and editing employee time cards in guHRoo. Timecard management is a key responsibility for managers, ensuring accurate payroll and compliance. We'll cover how to approve timecard edit ...guHRoo HRIS: How to Approve Time Cards
In this guide, we will walk you through the process of approving and editing employee time cards in guHRoo. Timecard management is a key responsibility for managers, ensuring accurate payroll and compliance. We'll cover how to approve timecard edit ...How to set up MFA (Multi-Factor Authentication) - for Admins
Adding Multi-Factor Authentication (MFA) enhances the security of your company’s guHRoo HRIS portal. This guide provides step-by-step instructions for administrators to enable MFA for the organization. Process Document: How to enable MFA (for Admins)How to set up MFA (Multi-Factor Authentication) - for Admins
Adding Multi-Factor Authentication (MFA) enhances the security of your company’s guHRoo HRIS portal. This guide provides step-by-step instructions for administrators to enable MFA for the organization. Process Document: How to enable MFA (for Admins)guHRoo HRIS: Manage and Set Up Company Links in Dashboard
The Company Links Dashboard card is a great place to save links you want your users to have easy access to, such as benefits administration, training resources, or the company website. Links added to the list are visible to all users in the ...