guHRoo HRIS: Track your Employee's Hours for Specific Jobs or Locations
Introduction:
This article provides step-by-step instructions for setting up Job Codes and Job Locations in guHRoo HRIS, as well as assigning them to employees. Proper setup of these elements helps organize employee time tracking by specific tasks or locations, ensuring accurate payroll reporting and billing.
Setting Up Job Codes
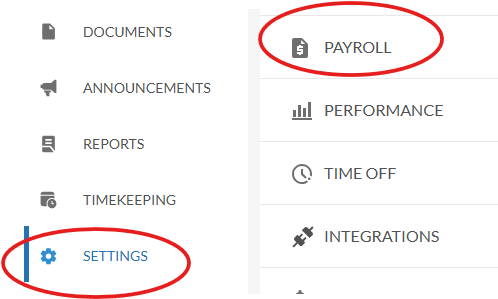
Navigate to Job Codes:
Go to Settings > Payroll and select the Job Codes tab.
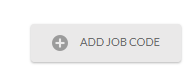
Add a New Job Code:
Click Add Job Code in the top-right corner.
Enter a Title and Payroll Code for the Job Code.
Leave the Active box checked to make the Job Code available for use.
Select 'SAVE'
Note: The Payroll Code is an abbreviation used by some payroll systems to categorize specific billable items.
Save the Job Code:
Once saved, the Job Code can be assigned to employees or edited as needed. Setting a Job Code to Inactive prevents it from being assigned or used for time tracking.
Setting Up Job Locations
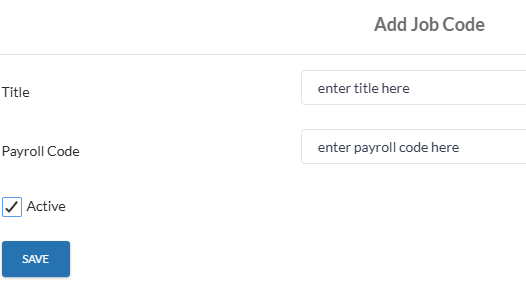
Navigate to Job Locations:
Go to Settings > Company Profile and select the Job Locations tab.
Add a New Job Location:
Click Add Job Location in the top-right corner.
Enter the Location Title and Address details for the Job Location.
Leave the checkbox ‘Active’ checked.
Note: Job Locations do not require a payroll code.
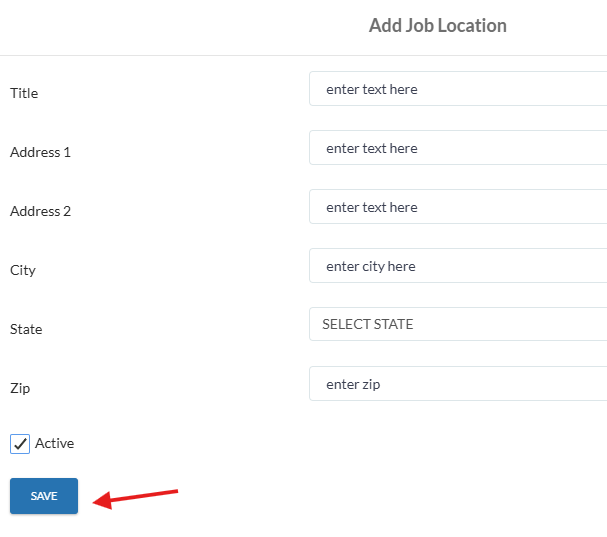
Save the Job Location:
Once saved, Job Locations can be assigned to employees or edited as needed. Setting a Job Location to Inactive removes it from use but keeps existing records intact.
Editing and Deleting Job Codes and Locations
Edit or Deactivate: You can edit Job Codes and Locations at any time. Deactivating a Job Code or Location prevents it from being assigned to employees, and any previously assigned records will no longer appear for employee time tracking.
To deactivate go back to the ‘Job Locations’ Tab
Click on the ‘edit’ pencil icon
Here you can make edit changes or uncheck the ‘Active Box’ to deactivate the job code.
Deleting: Deleting a Job Code or Location permanently removes it from all records, including past time entries. This action cannot be undone, so consider setting it to Inactive if you only want to stop future use.
To delete a job code go back to ‘Job Locations’ Tab
Click on the trash button
Confrim the action by selecting ‘Ok’
Assigning Job Codes and Job Locations to Employees
Open Employee Profile:
Navigate to My Team > Click on the Employee > Go to the employee’s Profile and navigate to the Job tab.
Assign Codes and Locations:
At the bottom of the Job tab, you’ll find fields for Job Codes and Job Locations.
Select the appropriate Code(s) or Location(s) from the dropdown, or start typing to search.
Employee Usage:
Once assigned, employees will be prompted to select the correct Job Code and/or Location when clocking in or adjusting their timecard.
Job Codes and Locations are also visible on time cards and time-tracking reports, making it easy to review and audit.
Important: If you deactivate or delete a Job Code or Location, it will impact employee time tracking. Consider carefully before making these changes to avoid unintended data loss.
Related Articles
guHRoo HRIS: Track your Employee's Hours for Specific Jobs or Locations
Introduction: This article provides step-by-step instructions for setting up Job Codes and Job Locations in guHRoo HRIS, as well as assigning them to employees. Proper setup of these elements helps organize employee time tracking by specific tasks or ...guHRoo HRIS: How to set up time tracking (for admins)
How to Set Up Time Tracking in guHRoo (for admins) Introduction This guide will walk you through setting up time tracking in guHRoo, a process that's essential for accurate payroll and time management. *You must be signed in as a client-admin user to ...guHRoo HRIS: reset an employee password
Need to reset an employee’s password in guHRoo? Whether an employee has forgotten their password or needs a new one for security purposes, resetting it is quick and easy. Follow the step-by-step guide below to learn how to update an employee's ...guHRoo HRIS: Where can I find my employee ID number?
Your Employee ID number is a unique identifier used for payroll, HR processes, and company records. You can quickly locate it in the guHRoo HRIS portal. Process Document: guHRoo HRIS: How to find my Employee ID NumberguHRoo HRIS: Pulling PTO Hours for Payroll
The hours people clock and PTO hours which you approve will be on the timekeeping report. The PTO hours only show if you approve them. The clocked hours will show whether or not you approve them, and they will say if they are approved. Go to the ...